--- title: Field Force Management url: https://www.velsof.com/blog/field-force-management/ date: 2026-05-05 type: blog_post author: Ayush Thakur categories: Blog --- Field Force is an intelligent field force management application built to help organizations efficiently manage their mobile workforce. Designed for businesses that rely on field agents, sales teams, service engineers, or delivery personnel, the app connects managers and field staff on a single real-time platform. From assigning tasks and tracking travel routes to monitoring productivity and managing expenses, Field Force digitizes every stage of field operations. By eliminating manual reporting, spreadsheets, and constant follow-ups, the app ensures better coordination, transparency, and operational control across the entire organization. # 1. Introduction ## 1.1 What Field Force Helps You Achieve - Centralize all field operations in one unified platform - Assign and manage field tasks in real time - Track agent location and travel activities using live GPS monitoring - Maintain accurate travel records with automated trip logging - Reduce manual paperwork and operational delays - Improve communication between managers and field agents - Enable faster decision-making through real-time visibility - Enhance accountability and workforce productivity ## 1.2 Key Capabilities - Task Management: Create, assign, monitor, approve, cancel or reopen tasks easily - Live GPS Tracking: Monitor travel routes, distance, duration, and movement status - Odometer Verification: Capture start and end odometer images for verified mileage tracking - Expense Management: Submit expenses with receipts directly from active tasks - Manager Dashboard: View team performance, task progress, and field activity instantly - Travel Logs & Reimbursement: Automatically generated trip reports for transparent approvals - Push Notifications: Instant alerts for assignments, expense approvals and task lifecycle updates - Role-Based Access: Controlled visibility for Admins, Managers, and Field Agents - Offline Awareness: Prevent data loss even in low-network environments ## [1.3 Designed For](http://www) - Sales Teams - Field Service & Maintenance Teams - Delivery & Logistics Operations - Inspection & Survey Teams - Facility Management Companies - Any organization managing on-ground workforce operations ## [1.4 Why Choose Field Force](http://www) Field Force transforms traditional field management into a smart, automated, and data-driven process. Managers gain complete operational visibility without constant phone calls, while field agents benefit from a simple and structured workflow. Every task, trip, and expense is captured digitally, ensuring accuracy, accountability, and faster operational execution. - No manual travel logs or spreadsheets - Real-time team monitoring from anywhere - Faster expense approvals and reimbursements - Improved operational efficiency and transparency Scalable solution suitable for growing teams # 2. Register your Company - Open the app - Click on the Register Here button. - A new window will open. Fill in all the details of your company. - After that, click the confirmation checkbox. Your company setup is now complete.  # 3. User Roles By default, the person who registers the company is assigned the **Admin** role. The **Admin** can now **create new users** for the company and **assign roles** to them. Other available roles in the app – - Project Manager - Task Manager - Field Agent  # 4. Admin - The **Admin** is responsible for creating users and teams. - The **Admin** can also create projects, assign teams to them, and monitor agents in the field. - Additionally, the **Admin** can approve tasks completed by users and review and approve their expense claims. - The **Admin** is also responsible for configuring the app settings according to their business needs.  ## 4.1 Admin dashboard The Admin Dashboard contains actionable cards that provide a summary of projects and activities within the company. These actionable cards function as buttons that navigate you to the corresponding sections indicated on each card. 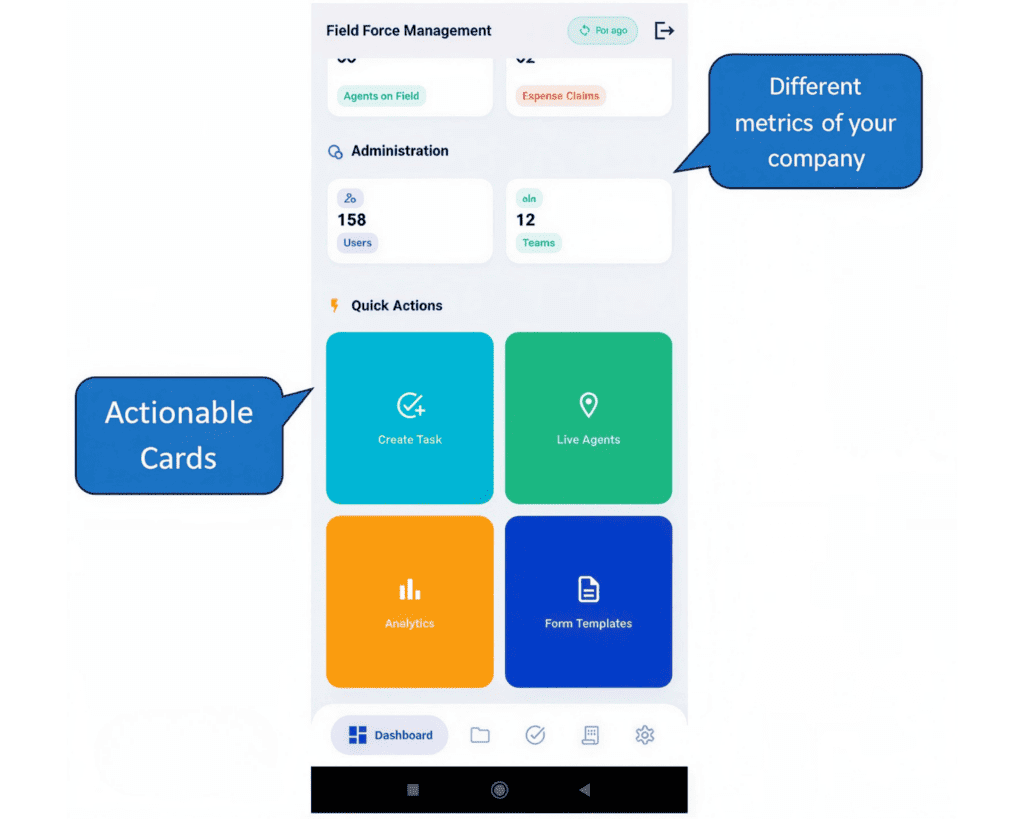 ## 4.2 How to create users in the app for your company? - Click on the Users button available on the Dashboard to create a new user. - A new section will open displaying the list of all existing users. - Locate the Add New User button at the bottom-right corner of the screen. - Fill in the details. - Click the button to create a new user. - **Note:** Only Admin users have permission to create new users. 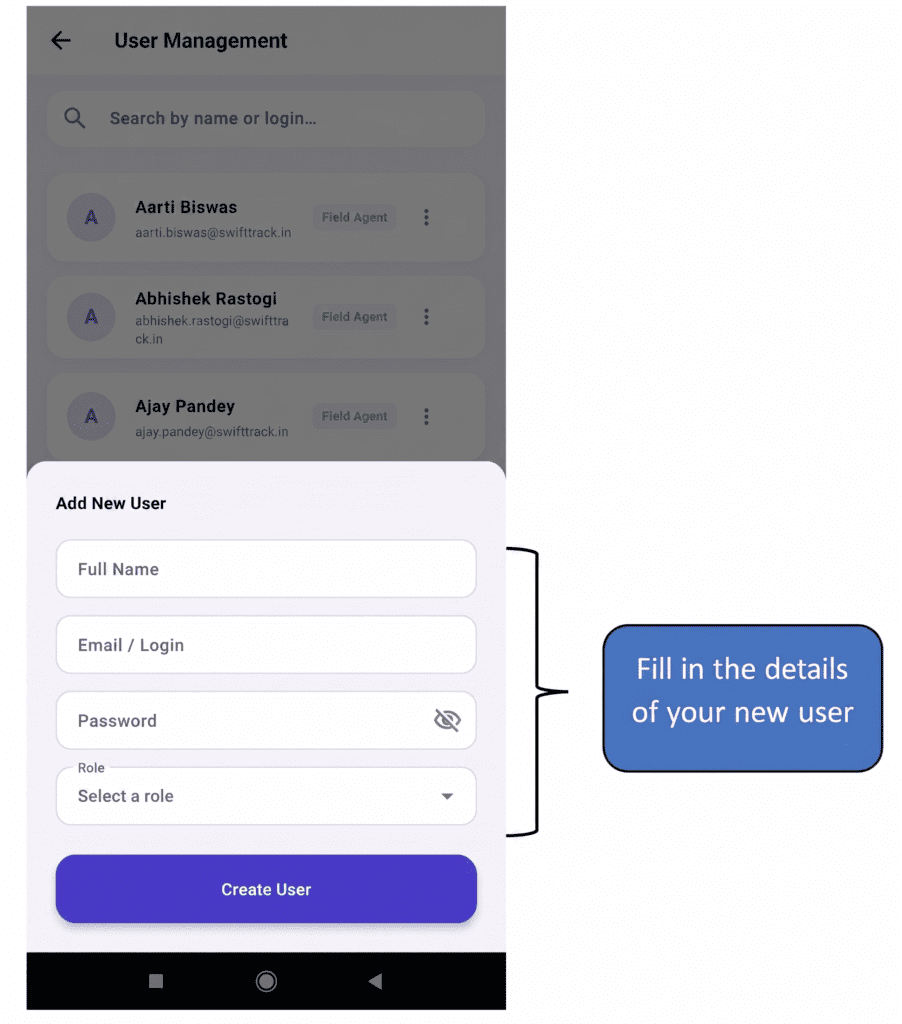 ## 4.3 How to create Teams? - Click on the Teams button available on the Dashboard to create a new team. - A new section will open displaying the list of all existing teams. - Locate the Add New Team button at the bottom-right corner of the screen. - Click the button to create a new team. - Add the Users you created in your team. - **Note:** Only Admin users have permission to create new teams. 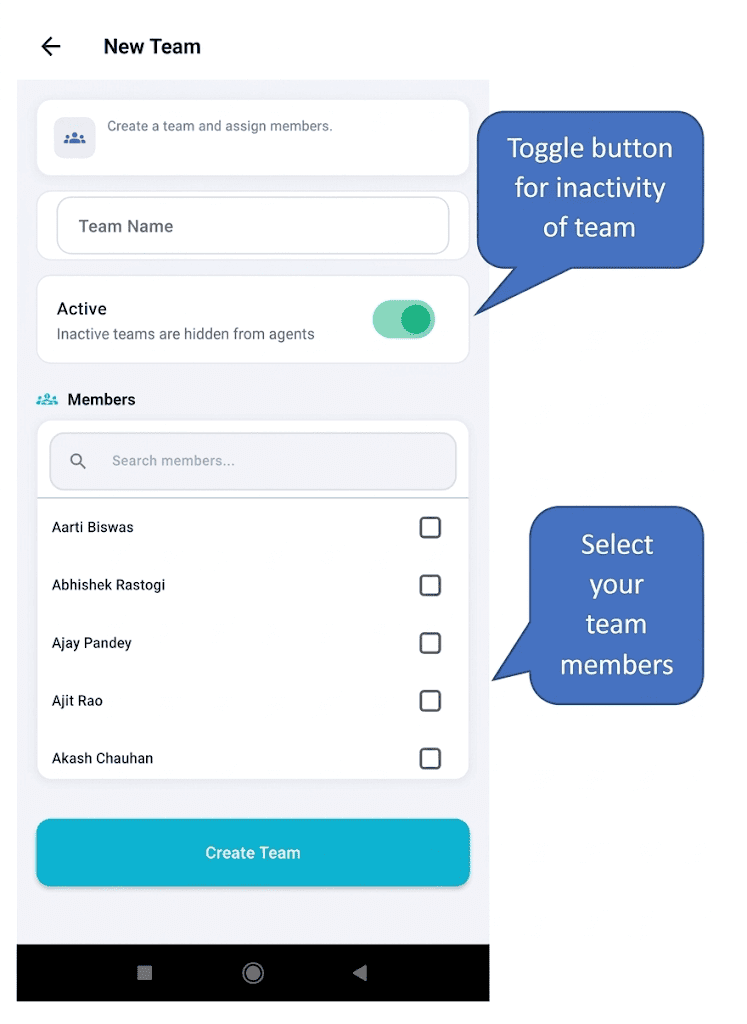 ## 4.4 Projects - Projects can be created in two ways: - From the Projects section. - By clicking the Projects button on the Dashboard. - Locate the Add Project button at the bottom-right corner of the screen. - Assign the reimbursement rate. - Assign the team for the project. - Assign the Task Manager for the project. - Click on the **Create Project** button. 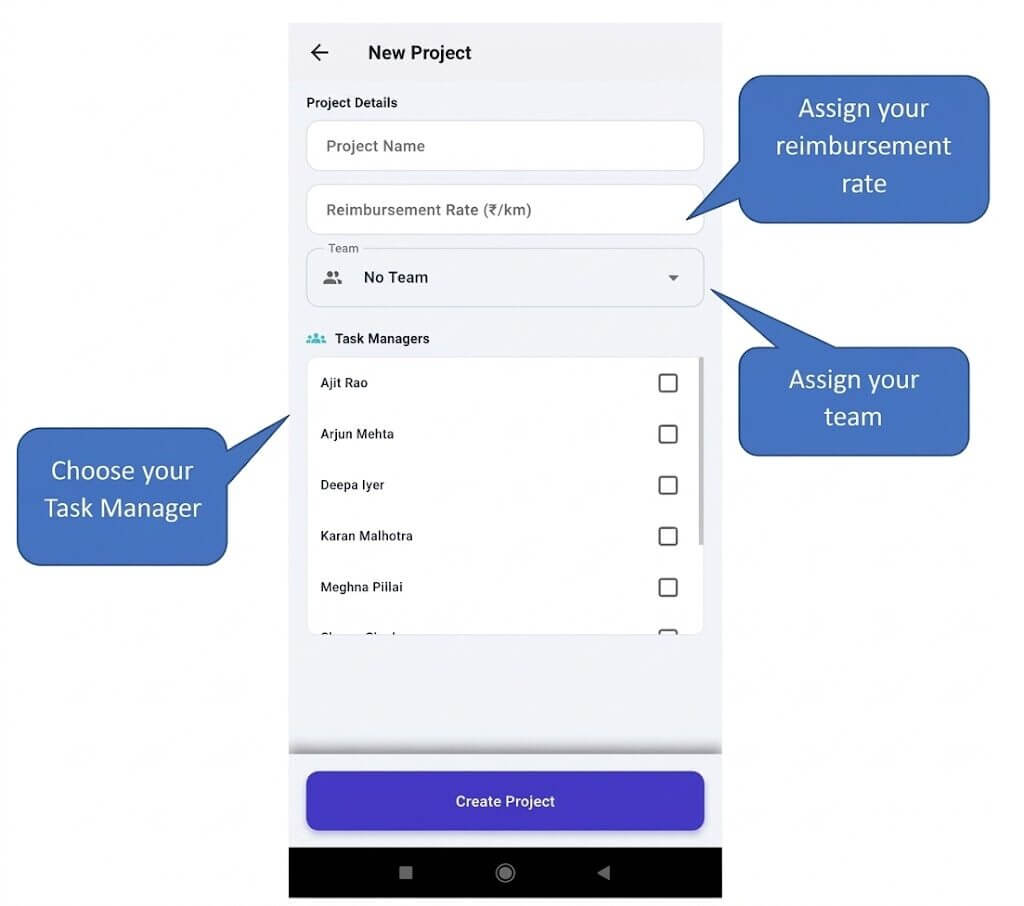 ## 4.5 Assigning a task to the Field Agent - To assign a task to the Field Agent, click on the Create Task button present on the Dashboard. - Choose the project to which the task is related. - Fill in your task details. - Choose the field agent. - After assigning the task to a field agent, they will receive a notification on their device. 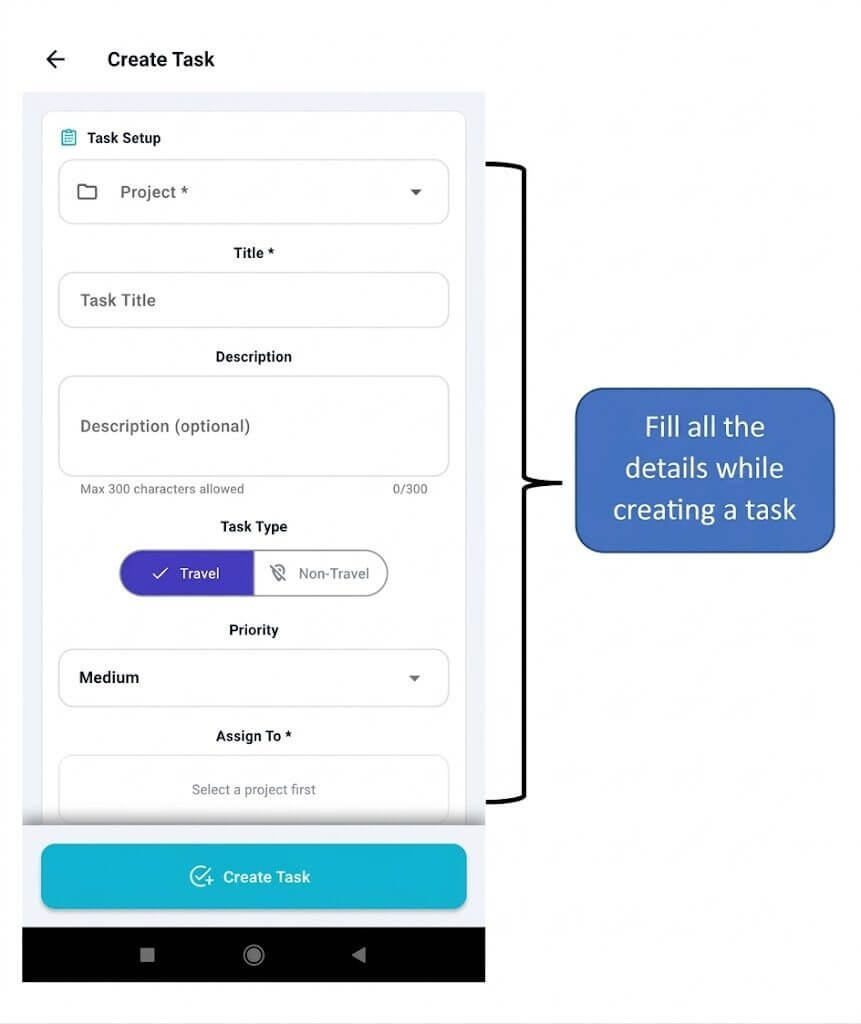 ## 4.6 Approving, Rejecting, or Reopening a Task after a Field Agent Completes it The **Admin** can approve, reject, or reopen a task after a field agent completes it. Every completed task must be reviewed by an Admin, Project Manager, or Task Manager. - Navigate to the Tasks section, or click on the Awaiting Review button on the dashboard. - Open the task you want to review in the Pending Approval section. - You will find the option to Approve, Reject or Reopen the task. - While **rejecting a task**, a rejection reason must be entered. 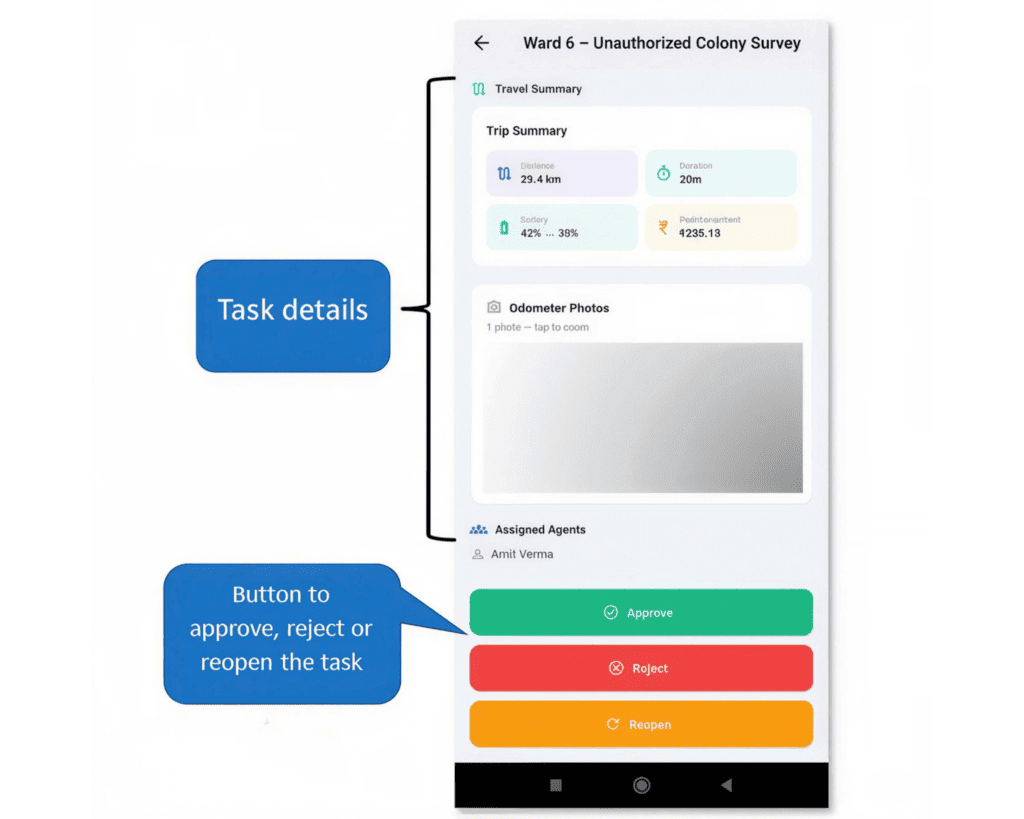 ## 4.7 Expense Expenses are the money spent by the field agent while completing a task. The **Admin** can define expense categories for the company from the settings section in the app. Every expense submitted by the field agent has to be reviewed by the admin, project manager or task manager. - To review an expense go to the **Expenses section** or click on the **Expense Claims** button on the Dashboard. - Click on the expense you want to review. - All the details and the receipt will be attached to the Expense. - You can click on approve or reject button. - While rejecting an **Expense claim**, a rejection reason must be entered. 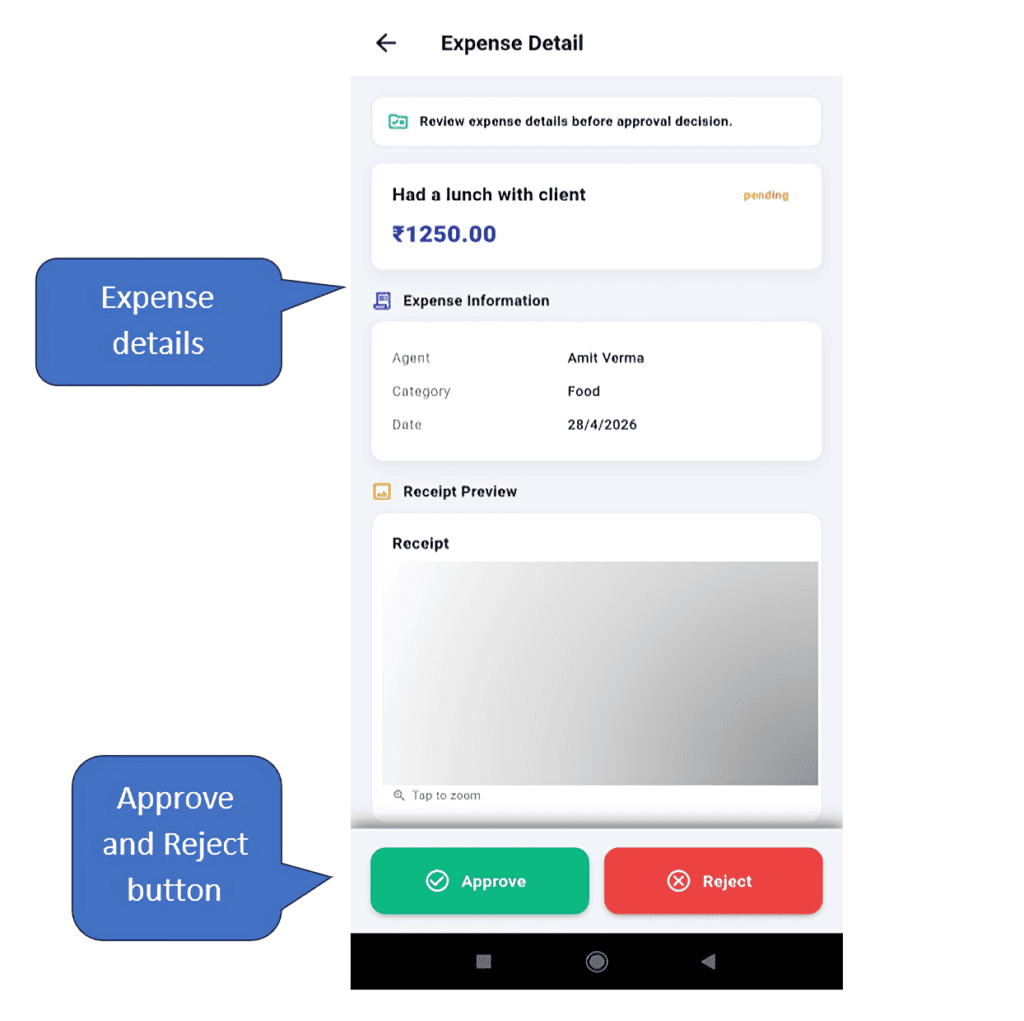 ## 4.8 Odometer capturing The **Admin** can enable or disable odometer image capturing from the settings. When enabled, field agents are required to capture an image of their odometer while starting, holding, resuming, and ending a task.  ## 4.9 Analytics The Analytics dashboard lets you view your field agents’ performance and other useful metrics. You can filter the data by week, month, and the last three months.  ## 4.10 Live Agents The Live Agents button on the Dashboard allows you to view all your field agents on a map. You can track their routes and locate them in real time. To see the agent’s route, click on the agent and then click on view route. 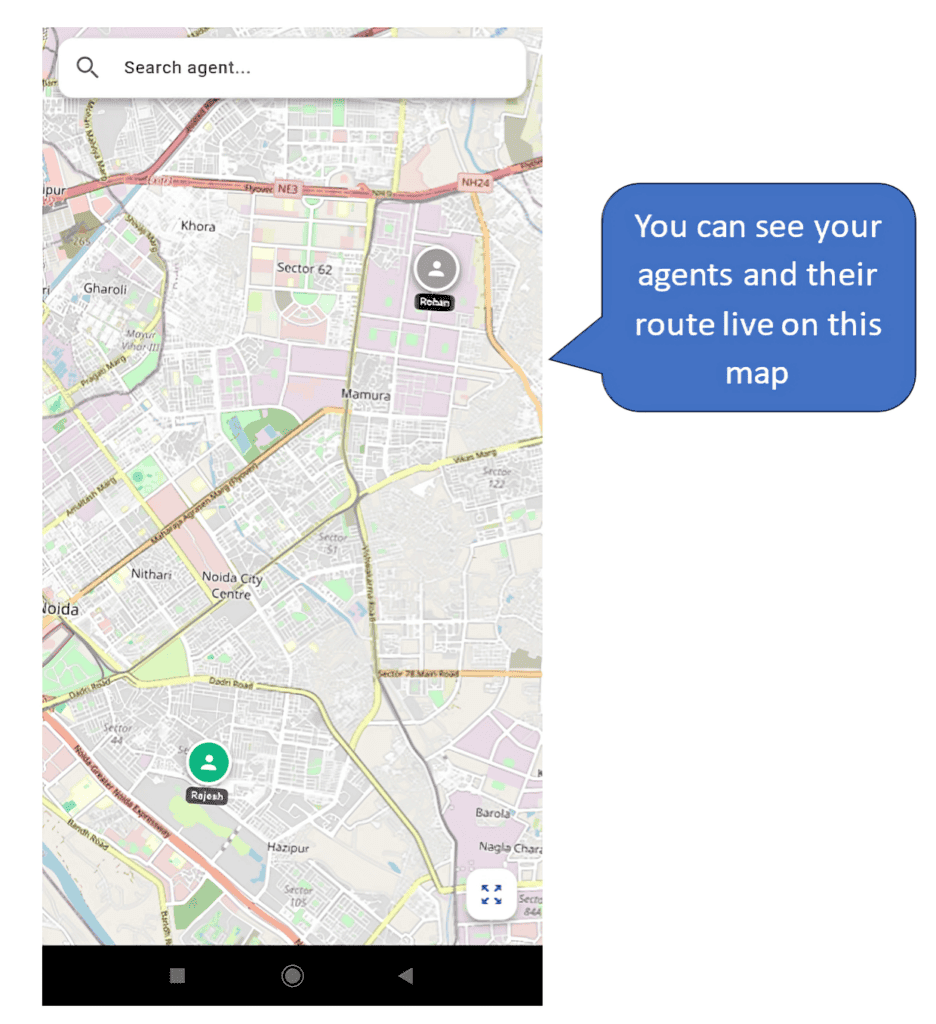 ## 4.11 Custom Form Templates Admins and Project Managers have the ability to create custom forms and assign them to field agents for completion during task execution. **Note:** Task Managers are permitted to assign forms only; they do not have permission to create them.  During form creation, the following field types can be selected: - **Text:** Used for text-based input - **Number:** Used for numeric input - **Dropdown:** Used to create a selectable dropdown list - **Checkbox (Multi-select):** Allows users to select multiple options **Note:** When adding option labels for Dropdown and Checkbox fields, make sure to save each option label before proceeding.  # 5. Project Manager The Project Manager can perform all actions available to an Admin, except creating Users and Teams. A Project Manager can view all projects, regardless of whether they are assigned to them or not.  # 6. Task Manager The Task Manager is allowed only to create and review tasks, as well as review expense claims submitted by field agents. They can view only the projects to which they are assigned.  # 7. Field Agents A Field Agent is the person to whom tasks are assigned. They are responsible for completing the tasks assigned to them by their supervisors.  ## 7.1 How to start a task? - To start a task, click on the **Pending** button on the Dashboard, or go to the **Assigned** section in the Tasks module. - Click on the task you intend to start. - Swipe the slider to start a task. - A pop-up will open to capture the odometer image. This feature can be enabled or disabled by the Admin. - During the task you can also submit expense claims. - **Note:** If the odometer capturing option is enabled, you cannot start the task without capturing the odometer image.  ## 7.2 How to end a task? - When the task is finished, click on the end task button to end the task. - Click the Odometer image if enabled.  ## 7.3 How to submit an expense claim? A Field Agent can claim expenses incurred while completing and fulfilling tasks. There are two ways to submit an expense claim – - From the dashboard (Project level expense claim) - While the task is in progress (Task related expense claim) ### 7.3.1 From the dashboard (Project level expense claim) - Click on the submit expense button available on the dashboard. - Select the project to which the expense is related. - Fill the details of the expense. - Capture the receipt photo. - Click on the submit expense button on the bottom of the screen.  ### 7.3.2 While the task is in progress (Task related expense claim) - While the task is in progress, click on the **Add Expense** button available on your screen. - Fill in the details of the expense. - Capture the receipt photo. - Click on the submit expense button available at the bottom of your screen.  ## 7.4 How to fill a form as a Field Agent? While executing a task, tap the **“Fill Form”** button located at the bottom of the screen. Complete all required fields and select **“Submit Form”** to submit the form.